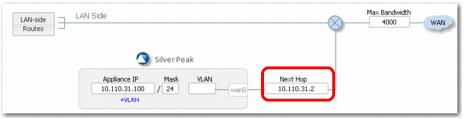
Now we’ll configure the Silver Peak’s data path next hop address to point to the new physical address of the router interface (10.110.31.2, in this example) and not the old one, which is now the VRRP group’s virtual IP address.
Failure to do so will cause a routing loop when the Silver Peak is the VRRP Master, since at that point, the Silver Peak will be processing traffic for the virtual IP address. If the next-hop IP for the Silver Peak still points to that virtual address, it will essentially be forwarding traffic to itself, creating the loop.
|
n
|
If you use VRRP with a single Silver Peak and its VRRP peer is another device like a router or L3 switch, then you want to configure the Silver Peak to have a higher priority than the router/switch and also enable preemption.
|
This ensures that the Silver Peak always becomes the Master and that the lower priority device (the switch or router) becomes the backup, so the Silver Peak can optimize traffic.
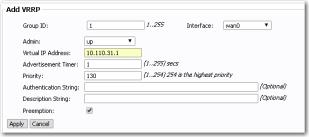
Many routers have a default priority of 100. Although the Silver Peak appliance’s default value is 128 (and therefore higher by default), in this example we’ll change it to 130 for the practice.
|
n
|
If the Silver Peak experienced a failure, the router/L3-switch (the backup device) would become the Master, and unoptimized traffic would be routed natively according to its routing tables.
|
|
n
|
After the Silver Peak comes back online, if it has the higher priority and preemption is enabled, it again assumes primary responsibility and would resume optimizing traffic. If you fail to configure the Silver Peak with higher priority, or if preemption is disabled, traffic will not be optimized when the Silver Peak comes back up because the appliance will not become the Master.
|
|
1
|
 |
|
3
|
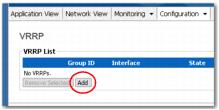 |
The Add VRRP area appears. Some fields display default values.
 |
|
a
|
Assign a Group ID number. You’ll use the same number for the primary and backup devices. Here, we’re using 1.
|
|
b
|
|
c
|
|
d
|
|
e
|
In the Virtual Address field, enter the virtual IP that you’ll be using for both the primary and backup appliances. In our case, it’s 10.110.31.1.
|
|
f
|
Priority and Preemption work together. If two devices come up at the same time, the device with the highest priority becomes the Master, and lower priority devices are backups.
|
If Preemption is enabled and a device with a higher priority comes online in the VRRP group, it becomes the Master even if another device is already acting as Master. The lower priority device then reverts to being a backup.
|
g
|
|
h
|
If you choose to use VRRP’s text authentication, then the Authentication String must be specified in all members of the group. In this deployment, that would include Site A’s appliance and the peered router. Here, we’ll leave it blank.
|